But I really wanted a large skylight above the will-be bed area. Since I'm still framing, this is the best time to do it.

Originally I planned to buy one singular thick piece of polycarbonate to use as the skylight, but the price and shipping wasn't something I could afford. I checked out a used RV place for the chance at a normal RV skylight (which honestly is just a domed piece of plastic that you screw/bolt the lip of it down to the roof and seal it), but I didn't like how they yellow over time from UV exposure, and they're expensive for what you get in my opinion.
So you know what, hey - let's build one!
For this project you'll need:
*Acrylic sheet for size you want
* 1 x 4 or similarly sized wood for framing
* 2 x 4s for corner bracket support (you could probably replace this with metal plates/brackets, but 2 x 4s worked for me)
*Contact Cement
*Waterproof silicone (or petroleum based) sealant (all weather)
*Spray Foam
*5/16th bolts with flat washers, lock washers, and nuts
*Outdoor wood deck sealer (anything to seal the wood a little better.
I started off by heading over to Lowes (Home Depot also sells these) and I grabbed myself a 2ft x 4ft Acrylic sheet, and headed home to try making one. (I used 1inch x 4inch (0.5 x 3.5) wood as the frame, as well as some small 2 x 4 pieces, but I had those lying around.)

I designed mine so that the glass sits on top of the wood framing, and the skylight will be taller than the roof line so that water couldn't pool on the glass and leak through. To do this I cut the wood so that the glass is slightly larger than the wood frame it sits on. Maybe half a centimeter or less on each side. To help keep the thin wood pieces together, and to make the entire frame taller than the roof line, I cut small pieces of 2x4s and screwed those into the wood.


Once the contact cement becomes shiny, it's time to bond them together. I grabbed the acrylic very carefully and placed it unto the frame. I was afraid it would stick immediately, but you could probably adjust it slightly - very quickly- after you put it on.
I actually let this dry overnight, but it dries fairly quickly. By the next day it was time to seal between the acrylic and the wood frame. I used the same caulking I used for the windows and door - waterproof interior/exterior caulking. I would recommend using a caulking that starts out white but becomes clear as this will help you make sure you get every air pocket in there.


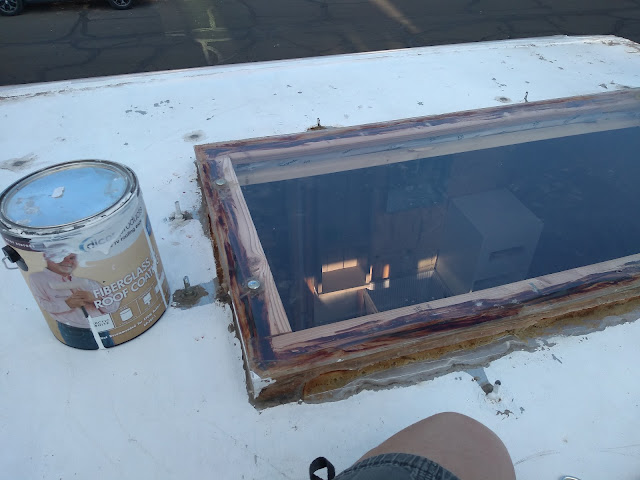
Once this set up, I painted on my wood sealer so I wouldn't have to worry too much about the framing rotting on the roof. Eventually I'll add flashing or something onto the frame on the roof - but at the moment this will work great as long as it doesn't leak.
At this point I have already cut the gaping hole for my skylight, and it's covered with plywood. I only cut the hole big enough for the glass to show through - not the wood frame, as I wanted that on top of the roof.
I had originally planned for the skylight lumber to bolt through the metal ceiling studs, but I discovered I couldn't drill through them very well at all, and then it turns out the aluminum sheet creating the roof isn't actually attached to the ceiling studs - it's only riveted on the side. I was really surprised the entire ceiling is practically just metal studs riveted to the metal headers on the side covered with aluminum sheeting; The only thing holding the aluminum ceiling down is caulking glue between it and the metal studs on the inside roof, and it's riveted to the steel headers on the side walls.
I have to figure out how to attach this wood skylight to aluminum sheeting - thin enough to bend back and forth with the push of my hand - and have it be structurally sound. I figured if I could re-structure the aluminum where my skylight attaches with wood (because it doesn't vibrate or move) then the skylight would be more than secure enough, but still be able to handle vibration from driving and all that. I cut some 1 x 6s to the width of the skylight, and drilled through them and the roof the same diameter as the bolts I'll use (I used 5/16th bolts.)


I would have added wood pieces for every side of the skylight if I hadn't positioned the skylight right next to the metal studs; Both the metal studs and this extra wood framing will direct any vibration away from the skylight and it will keep it more secure down the road. If the skylight isn't butted against something that runs the length of the wall, then it should be framed all around. In my case, I only added support for the shorter sides as the longer edges both have metal studs next to them. Once I had the holes drilled in the correct spot for my wood framing and skylight, then I ran the bolts through the skylight and dropped it down through the holes of the wood frames and tightened them against each other. I added metal straps I bolted through the ceiling and screwed into the frame as an extra strength to hold the skylight down to the aluminum. In retrospect, I'm not sure if this was needed. But it doesn't hurt either!


At this point it's bolted down but there's a gap between the framing underneath the glass (the 2 x 4s ) and the aluminum. I filled up this gap with spray foam.


Eventually I went back unto the roof and sealed around the foam and wood framing with a roofing caulking


So there we are! I absolutely love the skylight - It really made the space feel larger and much brighter. Once I add the ceiling studs and insulation then I can frame around those bolts and trim out the edges of the skylight to make it look nice and neat.
Thank you for reading and I hope this gave you some creative ideas for your build or project. Till next time!
Sincerely,
Kelli
-----------------
Update: Feb 27, 2022
The structure of the skylight has worked great so far, but it has leaked. (From the edges the wood meets together in the corners) If you make your own, I would suggest using pressure-treated wood, stainless steel bolts, and I sealed it with asphalt tar - which had sealed it for about two years until recently. I think the wood is contracting/expanding too much so I've patched it and will coat it again with a roof sealant. Silicone has sealed it for the time being. The acrylic can take a beating though so that's been great otherwise! Any spray foam has to be trimmed and covered with something; it will break down into dust and leak quickly.
UV breaking down the foam and silicone bond

| First time working with tar - I dished it out with a cheap plastic wide spatula. |
 |
| If you get any on the acrylic, have some acetone ready. |